
Tired of complicated EPFO claims? Our step-by-step guide with screenshots makes filing online simple. Get your funds in no time—start now!
Step-by-Step Guide to Filing an EPFO Claim Online (With Screenshots)
Hey there! If you’re looking to file an EPFO claim and aren’t sure where to start, you’ve come to the right place. The Employees’ Provident Fund Organisation (EPFO) in India manages your provident fund (PF), and filing a claim lets you withdraw your hard-earned money when you need it—whether it’s after leaving a job, retiring, or for specific needs like buying a house. In this blog post, I’ll walk you through the entire process of filing an EPFO claim online, step by step, with screenshots to make it super easy to follow. Plus, I’ll sprinkle in some tips to ensure everything goes smoothly. Let’s get started!
What You’ll Need Before You Begin
Before we jump into the steps, let’s make sure you have everything ready. Trust me, having these in place will save you a lot of hassle later:
- Universal Account Number (UAN): This is your unique EPFO identifier. Your employer should have provided it to you.
- Password: You’ll need this to log in to the EPFO member portal. Forgot it? No worries, you can reset it online.
- Aadhaar Number: It should be linked to your UAN for KYC verification.
- Bank Account Details: Ensure your account number and IFSC code are updated in the system.
- Mobile Number: Linked to your UAN for OTP verification.
Got all that? Awesome! Let’s move on to the fun part—filing your claim.
Step-by-Step Process to File Your EPFO Claim Online
Step 1: Log In to the EPFO Member Portal
First things first, head over to the EPFO member portal at unifiedportal-mem.epfindia.gov.in. You’ll see a login page where you need to enter your UAN and password. Simple, right?
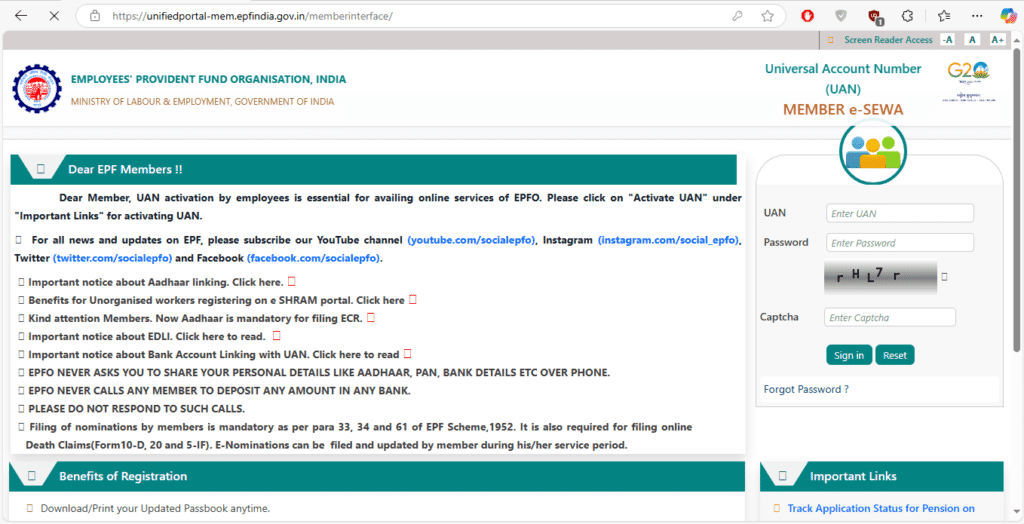
Once you’ve entered your details, hit “Sign In,” and you’re in!
Step 2: Verify Your Details
After logging in, you’ll land on your dashboard. Before filing a claim, let’s make sure everything’s up to date. Click on the “Manage” tab and check your KYC details—your Aadhaar, bank account, and PAN (if applicable) should all be verified. If something’s missing, update it now to avoid delays later.
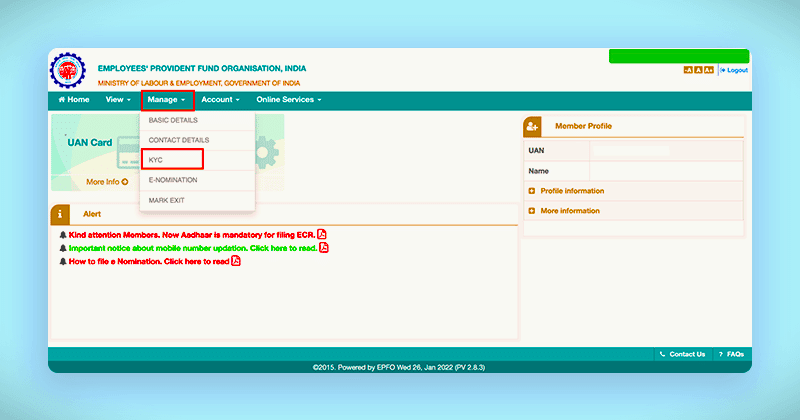
All good? Great, let’s proceed!
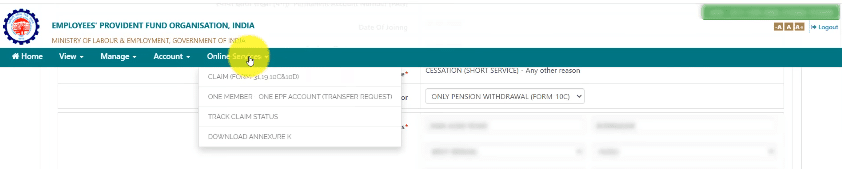
Step 3: Select the Type of Claim
Now, go to the “Online Services” tab in the top menu and select “Claim (Form-31, 19 & 10C)” from the dropdown. This is where you choose what kind of claim you’re filing. The most common one is the final settlement (Form 19), which lets you withdraw your full PF balance when you retire or resign. Other options include partial withdrawals (Form 31) for things like medical emergencies or a pension claim (Form 10C) if you’re eligible.

Pick the one that suits your needs and click it.
Step 4: Fill Out the Claim Form
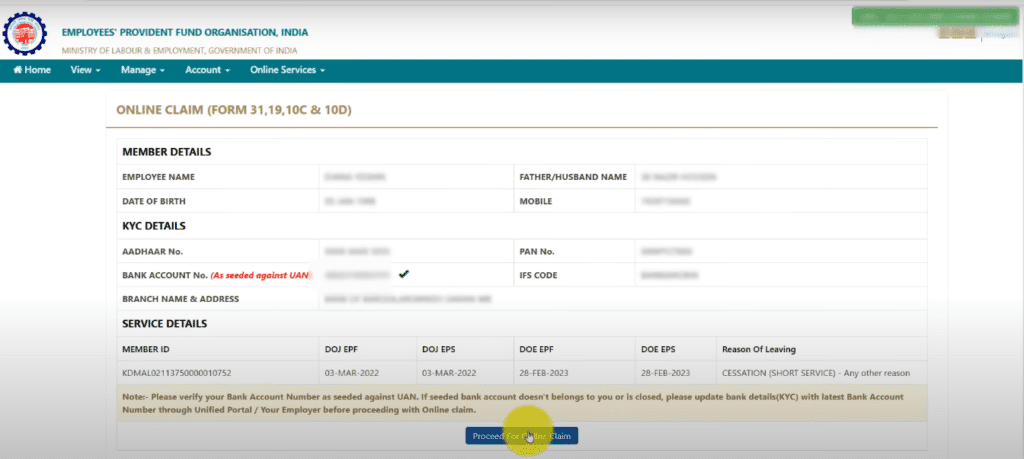
Next, you’ll see a form where you need to enter some details. The portal will auto-fill some info tied to your UAN, like your name and PF account number. You’ll need to add your bank account details (double-check the account number and IFSC code!) and specify the amount you want to withdraw. If it’s a final settlement, you can request the full amount.

Take your time here—accuracy is key. Once you’re done, click “Proceed.”
Step 5: Submit the Claim
Before submitting, the portal will ask you to verify everything with an OTP sent to your registered mobile number. Enter the OTP, review your details one last time, and hit “Submit.” You’ll get a confirmation with a reference number—keep this handy!
Congrats, you’ve just filed your claim!
Step 6: Track Your Claim Status
Want to know how your claim’s doing? Back on the dashboard, go to “Track Claim Status” under “Online Services.” Enter your reference number, and you’ll see updates on whether it’s been approved, processed, or if there’s anything else you need to do..3
And that’s it—your part is done! Now, just wait for the funds to hit your account.
Tips to Make Your EPFO Claim Process Smooth
Here are a few handy tips to avoid hiccups:
- Double-Check Your Bank Details: Wrong info can delay your payment.
- Ensure KYC is Complete: Missing Aadhaar or bank verification? Fix it before you start.
- Save Your Reference Number: It’s your key to tracking your claim.
- Be Patient: Processing can take a few weeks, so don’t panic if it’s not instant.
Common Issues and How to Fix Them
Ran into a snag? No worries, here’s how to troubleshoot:
- Forgot Your UAN or Password? Use the “Forgot Password” or “Know Your UAN” options on the login page.
- Claim Rejected? Check the rejection reason in the portal, fix the issue (like updating KYC), and resubmit.
- No OTP? Ensure your mobile number is linked to your UAN under “Manage.”
Wrapping Up
There you go—a complete, step-by-step guide to filing your EPFO claim online! I hope this makes the process feel less daunting and more like a breeze. If you found this helpful, feel free to share it with friends or drop a comment below with any questions—I’d love to assist you further. Happy claiming, and here’s to getting your funds without the stress!

मैं Saurabh, एक टेक-प्रेमी ब्लॉगर और डिजिटल गाइड हूं। Saurabh Blogger पर मैं आसान भाषा में टेक्नोलॉजी की जानकारी, भरोसेमंद ऑनलाइन कमाई टिप्स, निष्पक्ष गैजेट रिव्यू और लेटेस्ट डिजिटल ट्रेंड्स शेयर करता हूं। मेरा मकसद है भारत के युवाओं को डिजिटल रूप से आत्मनिर्भर बनाना।